Tuesday, December 1, 2009

Extending the Life of Your Hairstyle

I promised my friend Rebekah I'd write about this many moons ago. Last January I was perusing some of my fav blogs when I found this article called "Going poo-free" (as in no shampoo ever again). I also let a friend/hairstylist cut my hair.* She told me she washed her hair once or twice a week. I talked about it with another friend who's mom washes her hair once a week (I think), and uses a specific product for her scalp. Here are the tips I heard for going more than one day without washing your hair:

1. If your scalp starts to get oily, lightly sprinkle/rub some baby powder or corn starch in. It absorbs the oil and deters future oil.

2. Spritz roots with hair spray before going to bed; it'll dry up the oil, but your hair won't be stiff in the morning.

3. Rat just the roots. Gives hair lift, so there's less contact with scalp oils, and it doesn't look matted down.

4. Nioxin used once a week to help with the scalp.

5. If you have your hair colored or highlighted, you shouldn't wash as often anyway; coloring dries out the hair.


So, my story. Starting in January, I began by going every other day without washing my hair. After about two weeks my hair was starting to get used to it. Then I went to every three days. Then, twice a week. And last, I made a big jump to once a week. (I waited a month before making any changes.) For now, once a week is my limit. If I try to go farther than that my scalp itches and I just don't like it. Not that I've seriously tried. I like once a week. Every Saturday morning, I pamper myself a little. I do a face mask; I exfoliate my skin and heels; I wash and spend time styling my hair. I take that one morning where I spend 45 min. or so on me. For a mom, that's a lot.

My routine is this (pics are under the day of the week I took them on):

Sat - Wash and style hair. If I don't style it on wash day, it looks kind of bad the rest of the week.

Sun - Just wake up, put my hair up to shower, and go. No styling necessary, and it's my best hair day.


Mon. - use baby powder at the roots and rat roots. I can wear it down, up, half-up, whatever.

Tues.- Maybe use baby powder, but usually not. I usually start wearing my hair at least halfway up.


Wed.- pony tail or pig tails or back in a hair clip


Thurs - Definitely a pony tail and headband. Almost every week.

Fri - Pony tail, french braid, tight bun, or dork knots. Kind of sucks for my hair to feel it's icky if I'm on a date, but I still prefer Sat as my wash day.

Here are my big pros for this: I spend less time in the shower and save money and water; I feel better about my hair because, overall, it looks much better than when I tried to style it every single day (even my ponytails look better); I use less shampoo. Cons: Sometimes I have an itchy scalp on the last day; my hair doesn't always look nice Wed-Fri, so if I go out on those nights, it's not quite as fun... but hair still looks ok.

Note that I don't use tips 2, 4, or 5. So, there's plenty more you can do, I just don't. Happy hair styling!


*Please note: I have cut my hair since high school with three exceptions by two friends I watched VERY closely before I let them touch my hair. After many many bad experiences, I figured that if I was going to be angry at anyone for my bad haircut, it would be me. And before I let those two ladies cut my hair, I made absolutely sure I'd seen enough that they couldn't disappoint me. So, it took me a long time before I actually heard any of this advice.
Monday, November 16, 2009

Little Girl Dress from Shirt

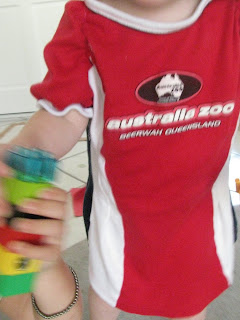
So, I have this shirt from the Australia Zoo that I bought on a vacation several years ago and I never wear. Often the things I decide I will never wear that are bright colors go in my girls dress-up clothes. My youngest found this and wanted it to be a dress, so I obliged.

It started out like this:
And ended up like the first pic. How? Well, you can kind of see it on the pic below. I ran darts (for those familiar with sewing), two on the back and two on the front, from the neckline to the hip area. It helped to bring it in and also created a bit more of a flare for a skirt. Then, I put elastic thread in my bobbin and ran a regular stitch under the arm and around to the top of the shoulder (almost to the neckline; about 1" away). That gathered it enough to make a poofy sleeve. If I remember right, I also did that around the bottom of the sleeve to complete the "poof."


I will leave one tid-bit I discovered. This was one of my first times using elastic thread. You only need it in the bobbin, so don't waste it on the main thread. My tid-bit, though, is to leave enough of a lead at the start and tail at the end that you can tie a knot with the elastic and main thread. Otherwise, when it's stretched, the elastic will come right out. Ah, the great teacher experience....

Wednesday, November 11, 2009

Knit/Crochet Dishloth with Tulle and Yarn


So, perhaps this isn't the most loverly dishcloth you've ever seen. For me, I had some extra green tulle a friend had given me and didn't know what to do with it. I also had some leftover cotton yarn. I had seen knit and crocheted dishcloths before. They looked like fun, but I regretted them not having more scrubbing power. Inspiration was in combining the cotton yarn with the tulle.

I just used a garter stitch for the rough part. To make that, I simply wrapped 1/2"-1" strips of tulle around the yarn as I went. I did that for 1"-2", making a nice scrubbing edge. Then I did the stockinette stitch for the rest. Total, it measures about 4"x6". You could crochet as well; the cloth may come out a bit thicker, which isn't necessarily a bad thing. I would suggest looking at Lion Brand Yarn for some of their free patterns. I really like them.


What I don't like about it: At first, the loose tulle would get some sticky things (like flour) stuck in it that were a pain to get out. Over time, the tulle has settled in and now no longer does that. I would not pick these colors again; the natural colored cotton hasn't retained too many stains, but it looks a dull gray now. I would definitely pick a medium to darker colored tone next time, or even a multi-layered color scheme.

What I do like about it: The size. It's about half the size of a normal store-bought dishcloth, but it's also thicker. My husband prefers these ones because they fit in his hand without him having to fold it over or deal with all this loose extra fabric while washing dishes. It does just fine wiping the counters even without the extra fold room. I also like the tulle for scrubbing. Especially now that it's settled in around the yarn, it's really pretty effective on non-stick surfaces while staying pretty gentle.

Monday, November 2, 2009

Ready to take the Plunge to Slave-Free Chocolate

I just wrote a whole long post ... and lost it. Grrrrr! It took me two days, too, what with kid interruptions.

So, short, less rational and less passionate version: I first heard about child/slave labor on cocoa farm here. It took me a while to really internalize that and decide to avoid child/slave labor chocolates, but now I have and I've been doing some online research. My biggest hang-up has been whether or not I need to avoid my favorite chocolatier, See's. Unless someone has already received correspondence from them, I'm going to write them and check.

There's a lot of back and forth you can read on this subject on the internet, and you can't believe everything you read, or just go with what comes up first on your google search. I've decided to believe that child/slave labor does indeed occur and that there is something however small that I can do about it. Why? Because the history of big business has depended on the exploitation of workers in the past and with political and social turmoil in the areas where cocoa is grown I wouldn't be surprised if it happened (Central African nations are of the most concern, though cocoa is also grown in Brazil and Central America-most of the slave rap focuses on Africa). Today I ran into this article, but it still leaves concerns about treatment of workers to me.

So, what to eat? Well, Consumption Rebellion has compiled a list/ranking of major chocolate companies that you can read here, though it is for Australia. I decided to check out the big players, and here's what I found:

Mars: Has a Cocoa plan thing; mostly focuses on environmental impact; depends on World Cocoa Foundation and International Cocoa Initiative - in CR's opinion these are meaningless in regards to actual working conditions, and I'm going with her viewpoint

Hersheys: Also has this Cocoa plan thing (lost the names and too tired to look them up; you can find them on each companies website); seems pretty similar to Mars; references WCF and ICI

Lindt: No mention whatsoever on website as to anything pertaining any of this as far as I could see

Nestle: Working toward Rainforest Alliance Certification by a certain year

So, it would seem from all this that of the big players, Nestle is doing the best. And it quite possibly is. I have a few concerns, mainly these:

1. One of Nestle's executives is on the Board for the Rainforest Alliance. Even if this doesn't mean their interfering now, I see this as a potential conflict of interest and compromises Rainforest Alliance's evaluation of Nestle.

2. Rainforest Alliance focuses mainly on environmental impact (which is great), but requires very little in the way of fair treatment/pay of farm workers. They don't permit child/slave labor, but due to reason #3, I'm not sure (especially 'cause I'm not sure if I read right) if this is a complete comfort.

3. Rainforest Alliance certification isn't very stringent; to get the logo only 30% of the product in question has to be certified (the actual percentage must be on the package). Why only 30%? Apparently they can't verify the sources for all of the product. Granted, they cover more than just cocoa, there are middle men, etc., but I still think that's silly. Also, from what I read, which I could be misinterpreting, it appears that the 30% in question only has to adhere to 50% of requirements. Again, not sure on that. Either way, too many loopholes. And big companies will find those.

I know some of these comments are knocking Rainforest Alliance. I think they are actually trying to work within the current system, and are actually finding a step that big companies will take, so I'm not completely opposed to Rainforest Alliance Certified products. With chocolate, though, I will only go for products with a high percentage of certified cocoa.

There is also Fair Trade and certain Organic Certified chocolate to take into account. I haven't done much research on the organic certified, and there are all sorts of organic certifications so that one is up in the air. I like what I've heard about Fair Trade. They operate with small business (which I like), and require much better payment/treatment of farmers and employees. I think that smaller business is more sustainable economically and also environmentally. Anyone who's ever had a garden and actually worked with the earth is more likely to make conscious decisions as long as their life isn't on the line.

As far as the differences between Rainforest Alliance and Fair Trade Certifications, I like this article. Basically, they both have pros and cons. But, mostly, they're coming from different perspectives (environment and social ethics).

Hope this was informative! Now, go eat some chocolate and let it sink in. :)

Friday, October 30, 2009

AppleJuice Apocalypse and Nutty Nums (plus a Ricotta bonus)

Ok. Just wanted to share two quick oatmeal adventures, one good and one awful. Awful comes first.

Apple Juice Apocalypse: I wanted an apple taste in my oatmeal, but didn't want dried apple or to go through the trouble of cutting up a fresh one. I had some apply juice and thought, why not? Do not do this! For some reason, I didn't think of apple juice as an acid, but when you're talking milk, it totally is. And my milk curdled while it was cooking. So, instead of a lovely hint of apple, I ended up with icky acidic whey and chunks of milk. Sound gross? Well, it was.

Nutty Nums: This is a good story. Not a love story, but a good one. Nuts. Chopped and added as a protein and flavor booster right at the end. Lovely. I used almonds. They were pretty good, but I think walnuts or another soft, creamier nut work better. Either way though, a hint of vanilla and last minute nut add-in = a nice fulfilling breakfast.

Ricotta Bonus: So, I've been making my own ricotta. Or some kind of version of it. Here's what I do -

I heat milk to about 200 degrees F (just before boiling). I add lemon juice or vinegar by the teaspoonful until the milk starts to just curdle. I add one more teaspoonful, and end up with some nice blobs of "cheese." (I seriously doubt this is a real cheese because there's no culturing to it.) I hang it over a bowl in a floursack towel (my cheesecloth's holes were too big) for about 5-10 minutes and use immediately. Great in lasagna, or ricotta almond spaghetti with pine nuts*. A half gallon of milk makes probably 2 cups of ricotta, but I could be wrong.

*Ricotta almond spaghetti: boil some spaghetti; save some of the water. At the same time, make your "ricotta." Mix together ricotta, some ground almonds (1/2 C?), salt and pepper to taste, dash each of cinnamon and nutmeg, and a few tablespoons of pasta water (helps sauce bind to pasta). Toss mixture with spaghetti, and add pine nuts. A nice autumn pasta.

Friday, October 23, 2009

Book, Art, Magazine organizers


I found this fun idea in a Family Fun magazine I was perusing while waiting for a doctor's visit. I'm using is to organize my children's coloring books, scrap paper, art supplies, etc. I found that only the absolutely honking big cereal boxes are big enough for most coloring books or construction paper to fit flat, so I also used an empty box that my garbage bags came in. I think it's a great way to recycle and organize at the same time. I bet kids would have fun painting them, too! Or if you wanted to put them up on a shelf, maybe paint them black and find some chalkboard paint (heard of it; never used it) to use on the spines for labeling.

Monday, October 19, 2009

Applesauce Adventuring


With apples going on sale here in SoCal (39 cents a pound at one store), I have adventured into the art of applesauce. I didn't look up any recipes. In fact, my only inspiration was an experiment on "Sid, the Science Kid."

I started by microwaving my apples, 'cause I figured that would break them down. I wasn't really thinking of the nutrients being mangled by micro-waves, but I did learn that even with sufficient water, the apple forms a little bit of a skin. So, microwave cooking is probably not the best. But the texture and taste after blending weren't too bad. I just had to add water.

Which pretty much left the stovetop. I next cooked them just enough and then ran the apples through a food processor. The resulting applesauce tasted more akin in texture to babyfood than applesauce. So, if you're making homemade babyfood, by all means run it through a food processor. It wasn't horrible, just not my favorite texture.


So, I just discovered tonight, after leaving the apples on the stove on medium for too long that they kind of fell apart in the pot. I spooned up some of the resulting breakdown. Low and behold it looked and tasted very much like real applesauce.


Perhaps just cooking it until the apple falls apart is the best method. And then maybe running over it with a potato masher or something. I am a bit concerned about the breakdown of vitamin C, though. Temperatures above 158 degrees Fahrenheit (70 C) can break down vitamin C. Since boiling point is 212 degrees F (100 C), that would mean boiling the apples would deplete it's nutrition. So, other than leaving it on the stove on low for a really long time, I'm not exactly sure how applesauce can be made without affecting the nutrients.

As far as how long it keeps: in the fridge, not long enough for my family to go through a big batch (maybe 2 weeks); in the freezer, I'll let you know- I'm trying that this time. Please leave any advice you might have in the applesauce department. I could probably google it, but I'm not really looking for a recipe; just techniques.

Well, in other apple related ranting, I have a question: Do you think homemade applecrisp with fresh ingredients is healthier than a sugary kids cereal (say, Trix or Cap'n Crunch)? Kids cereals are fortified with vitamins and minerals, but they're also loaded with sugar. (And I just read somewhere that over-consumption of sugar can decrease the amount of certain minerals your body can take in. I just read it, so the source may not be valid, but honestly I believe it... hope I'm not wrong.) Applecrisp also has sugar, but most of the sugar is natural from the apples. And the topping I use also has oats in it. (I don't pay attention to fats unless they're hydrogenated; I feel like over-consumption of sugar is far more detrimental to my health than healthy fats.)

So, basically, which do you think is healthier for breakfast: applecrisp or kids cereal? I think you can all tell where my vote lies.

Friday, October 9, 2009

Me and Living Things

Due to comments about the freakiness of my amazing yellow spider (which found a new home or was eaten the day after I found him), I need to explain something: I have a degree in biology and I worked in field research on aquatic animals, including what I find to be the most grotesque and vicious living thing - dragonfly larva (they bite... hard). I have also lived in a home where a spider egg sac must have hatched on the kitchen table as I was reading and had a spider run across my bed while I was on the phone (bad landlord). Basically, I'm no stranger to close encounters of the creepy kind. And this was a truly beautiful spider.

I have developed a great appreciation for living things. I think I've always had it, but it has become more refined over time. For example, we've had some ants in our kitchen, and I wince every time I kill one. I know they shouldn't be there, but I can't help but feel their death is my own fault for my lazy uncleanliness. And in our house, we generally try to save spiders. If they are in a bedroom or too close to my kids, they die; I just can't run certain risks. I know a lot of people are scared of them, but ... have you ever watched a spider spin a web? It's one of the most beautiful, patient, and creative natural events I've ever seen.

I really love living things, but I must admit there is one creature that will never survive if it sets creepy feet in my home (if I see it, of course). That is a cockroach. I can stand dragonfly larvae, spiders, ants, worms, snakes, lizards, rats... but any cockroach I see is DOA. I recognize that cockroaches are amazing and resilient creatures that have a purpose and function in this world. I just don't want to see it and I don't want that purpose invading my territory. Luckily our new place doesn't have that issue.

So, what living creature really freaks you out? And what is the most inspiring natural scene you've experienced?

This is another spider we found in our yard. I believe it's one of the yellow agriopa species. It moved after a week or two to I don't know where. Or it was eaten. At first I was worried. But, after researching, I found out that agriopa build their nests so that they can be suspended in the middle in plain view, to deter larger animals from destroying their nests. And what decently intelligent animal wouldn't be wary of a 3-4" arachnid? They aren't horrifically poisonous. And since we could always see it, the girls knew to stay 4' plus away from it (thank goodness for instinct). I was almost sad to see it leave; I'm sure it kept a lot of pests away.

If you really want to see insects in a new way, see the season 1 Green Porno shorts on Sundance Channel. I cannot in good conscience 100% recommend them, 'cause while they may be about animals, hello, the name is Green Porno. Basically it is animal/insect sex explained/acted out. Some of them are very funny to me (the spider and the bee), and some are pretty mild (season 3 squid and sardine). But, if you're uncomfortable with the words penis and vagina, don't watch them. If you're uncomfortable with gender specific body suits, don't watch season 3 shrimp or season 1 snail. And do not watch the fly one unless you like horror!

My Lizard Friend and the Amazing Yellow Spider


This is my friend the lizard. We have lots of lizards around here, but this one will always be dear to my heart. Those you spend time on always are.

My daughters found this little guy (or girl) one day on the edge of one of my seedling containers. I was amazed at how close he let us get. Then they found him the next day. I thought he'd just found a nice spot that he liked. On day three, though, I knew something was amiss. I checked and realized he was caught by some duct tape I'd used to secure the container. I had accidentally left some of the tape exposed and his/her fine toes had been caught.

I cut the tape off and, wearing gloves, I carefully used a small knife to extract his body from the tape. It took about a half hour, but at the end, he/she only lost a few scales. I will never carelessly apply duct tape again.


This is a spider I barely noticed. One of my daughters had asked me five minutes before I noticed the spider if she could pick this particular flower. I'm so glad I told her no! Isn't this an amazing camouflage?

Friday, October 2, 2009

Homemade Deoderant/Antiperspirant

Sounds pretty loony, huh? But, I thought I'd give it a shot. I researched several recipes. The one I wanted to try was on the angry chicken blog; the one I ended up using was one one green generation's recipe. Except that I tweaked it. You can read on one green generation about her experience. Here's what I did:
1 part non-aluminum baking soda (I did 2 Tablespoons) to 4 parts corn starch (I did 8 tablespoons), add several drops of essential oil or, in my case, Trader Joe's lavender body oil.

Mix in a food processor. Put in a small jar (mine is a washed out lemon curd jar). Apply with a make-up pad, cotton ball, or knit/crochet a small cotton pad like the one I made.

I needed a bit more baking sodathan one green nation 'cause I guess I just have a stonger or more prolific smell. What I like about this is you can adjust the ratio of baking soda/cornstarch based on your body type. No rashes yet and I've been using this for a month. Hope it keeps working, 'cause it's way less expensive and works even on those very hot days.

Friday, September 25, 2009

Recipe for Homemade Drums


Materials:

Carpet roll - call some local carpet stores; you only need one, 'cause one will make like 20+ drums
Saw or razor blade
Drill and drill bits
Sturdy string (I used kite string)
Durable plastic "fabric" or leather
Needle
Paint (optional, but way more fun)
1/4"-1/2" thick rope


Here's a pic of the carpet rolls in the garage. Only get one! The rest are just taking up space and filling themselves with silly little spiders. I shouldn't have taken 3, but I didn't know any better.

Take a saw or razor blade and cut cylinder in 10" segments. Around the top edge, drill small holes just big enough for a needle with your string to get through about 2" from the top. Just above the middle on opposing sides drill a bigger hole that the rope can just barely fit through, if you're doing the neck string.

Paint it if you want; put on a non-toxic sealer if you want to make sure the kids won't lick off any paint if you're worried about that sort of thing. Be careful of the holes or just redrill after the paint dries. If you just try to drill after painting, you'll probably crack the paint. I know because I tried.


Cut out a circular piece of plastic/leather that's about 3-4" wider than the tip of the cylinder. You'll sew the plastic/leather on through the holes you drilled. Make sure it's tight. Tie the ends of the string together. Put the rope on so the ends are on the inside. Make a knot so it can't get back through. Sand yourself up some dowels and you have drum sticks.

Have fun drumming!

Thursday, September 3, 2009

Amazing Artist, Visually and Vocally

I saw these videos/heard these songs a few months ago. I really like Lisa Hannigan. I like her voice, her style, and her art.

Watch her here: http://www.vimeo.com/2814124

(Just realized I hadn't actually posted this yet... ach!)

Wednesday, September 2, 2009

A Different View on Depression & the Story of Stuff

Hi, all.

I just found this article in Scientific American so interesting I thought I'd share. It's an article exploring the possibility of depression as a preserved evolutionary function to help animals (humans included) analyze complex social problems by focusing solely on those problems. I've never been truly depressed myself (my closest understanding would be from PMS), but it's an interesting thinkpiece.

Also, for anyone I may have missed when I sent out an email on the Story of Stuff, just click here and it'll direct you to the video. It's 20 min, but an interesting watch. I don't agree with all the premises or the occasional misleading cartoony depiction, but my husband and I have had an interesting time thinking about the content. (We also love to analyze films, so we had fun picking it apart.)

Happy think-piecing!

Tuesday, September 1, 2009

Sprouting Potatoes

So, I tried sprouting potatoes this year. I haven't actually found out if they'll produce, but I do have some very healthy looking plants. I tried twice before I finally landed a healthy sprouting technique, and even then I lost some. Oh, and I did this using potatoes from the grocery store.

The first time, I tried taking potatoes whose eyes hadn't yet formed. It didn't work. I found out that many companies/producers spray a chemical on the potatoes to delay or prevent eye formation so the potatoes stay good on their way to the store. Just one more reason to wash your vegetables, 'cause who wants to be eating that!

So, next I let some potatoes sit in the cupboard for a bit (they were from Costco's gourmet blend potato bag). I found some with some great eyes sprouting. (For those who may not know, the eye of the potato is the little growths that sprout out at various spots.) I cut the potato about a 1/2" below the eye, making sure they could sit flat with the eye up. Then I used the rest of the potato. I put the piece with the sprout in an old applesauce cup (dang those things are useful!) with water just up to the bottom of the eyesprout. After a bit, they put out roots. Here are some pictures:


You can see the roots coming from the sprout in the eye. I actually had the hardest time with the white potatoes rotting where they contacted the water. I changed the water every morning at breakfast time, cutting out any rotting spots. After a few weeks, I actually had leaves forming. When the roots were just getting too long for the applesauce cup (wrapping in circles around the bottom), I put them in pots ('cause we still have pretty difficult clayish soil).

From what I've heard, potatoes need to be covered with new dirt every once in a while, so I planted them as low as I could in the pot. Even still, the plants shot up, and I was covering them with dirt every 4-5 days. I finally ran out of pot to fill. Here's a picture of what they look like 2 months after I started:
I'll let you know how it goes!

Tuesday, August 25, 2009

I'm a Codfish

A friend and I were talking one day while our kids played together. A little of this, a little of that. Nothing and Everything all at the same time. You know how it is.

I had mentioned my recent discovery that older women feel bad about how their necks look (based on some older female friends reading the book "I feel Bad about my Neck"). She told me about a woman she knew growing up who had the most amazing neck at like 60. This woman had shared her secret... and I'm going to share it here. It's oh so complicated, so pay attention. I call it the Codfish.

Look at the ceiling. Open and close your mouth like a fish. Repeat for as long as necessary (2 min; 20 min; 20 times... whatever you can handle).

Silly, huh? Except that when you do it, you can feel your neck, under your chin, and your collar area moving. Makes sense that if you work the muscles a little, it'll firm up. I won't know the results for sure until I've added some years. But, it's worth trying, right?

Oh, and I'd suggest doing the Codfish in the shower washing your hair or when your on the lav. After all, it's not really silly if no one can see you. (wink!)

Wednesday, August 12, 2009

Reconstructing a Tee

I was reading in on my favorite blog, Simple Green Frugal Co-op, about reconstructing clothing (taking clothing you no longer need or like anymore and turning into something you will need or like). It pointed me to a few cool sites, but I spent the most time checking out threadbangers, a youtube group for Do-It-Yourself types. After getting the ideas and principles behind some of their t-shirt reconstructions, I made this from one of my husband's old t-shirts:


Much cuter than the oversized t-shirt it was (sorry no pics of the before; I barely remembered to take pics of my steps). I took this picture before the last step, so the bottom doesn't flare as much. Since I made this up, I have no qualms showing someone how to do it. If it is similar to something someone else has done, I'm sorry, but we'll just have to say great minds think alike. So, here's how I did it:

1. Turn the oversized shirt inside out. Place a shirt that fits your frame on top, lining up the shoulders. With a pencil, chalk or whatever (you'll be sewing over it anyway), draw a line a 1/2" out on each side. The 1/2" is for seam allowance.


Be sure that from the armpit line, you kind of curve it around so that the line from the side makes a consistent line around to the end of the sleeve. Don't forget seam allowance here either!


2. Be sure to use a ball point or jersey needle! Otherwise you can pierce the knit and cause unraveling or a run. Sew in a basting stitch along the lines you drew on both sides. Turn the shirt right side out and make sure it fits. If you're sure it fits, then just inside the basting, go over each side with a knit stitch or narrow zig-zag. Since this is made with a t-shirt, if you use just a regular stitch, the thread can actually pull at and tear the knit, plus it won't stretch the way it's supposed to. Go ahead and cut off the excess fabric, including the basting if possible.


3. I know this is hard to see, but next you rip the seam on both sleeve edges. You actually don't have to do this; you can just cut the sleeve edge off. I liked to use the lines from the seam, though, since I absolutely hate using pins.


A bit of the underarm seam may come undone. Just sew it back together.


4. Along the bottom hem of the shirt, make a small cut perpendicular to the shirt bottom. Don't go through the hem stitching.


Cut along the edge of the hem seam all the way around the bottom of the shirt. This is what you use for the neckline, so keep it!


5. Next is the neckline (sorry some of the pics are sideways). You'll make a line about 1/2"-1" from the neckline seam. Make sure your strip of fabric from the bottom of the shirt will go all the way around easily.


Cut on the line.


6. Next, with the raw edges of the strip of hem fabric pointing up (it should still be doubled over, just like when you cut it), line up the raw edge of the hem strip and the neckline. The hem strip should be on the right side of the t-shirt.


At the middle of the back neckline, leave about an inch of the tail end pointing "up" at a 45 degree angle from the neckline; it will leave a little tail you can cut off later (I hope that makes sense). If you prefer pinning, this would definitely be a good time to pin. Stretch the hem strip slightly as you pin it. You want it to be shorter than the shirt's neck. The tighter you stretch it (obviously to a point), the flatter it will lay against your chest and neck. Leave a "tail" with the other end of hem fabric.


Sew together. The "tails" create the effect pictured here. This is a view of the inside of the back shirt collar after I cut off the excess.

After you sew the edges together, turn the hem fabric up. Sew 1/4" below the seam line to keep the collar from flipping up. Again, I hope that makes sense. Let me know if it doesn't so I can try to rewrite it.


This is what the right side of the collar should look like after all that.


7. The sleeves. Basically, with the shirt inside out, pull the sleeve edge over about 3" or so if you want my look. Sew the raw edge of the sleeve down, going all the way around the circle of the sleeve, and then also sew a line about 1/2"-1" out from there (I followed the sleeves previous seam lines). This creates a tube of sorts. Do this to both sleeves.

If you just cut off the sleeve hem instead of ripping it out, you'll probably only have room to make a princess style sleeve. Only pull the sleeve edge over about 1" and do the same sort of thing.


Turn the shirt inside out. Cut two small slits between the two lines you just sewed in just the top layer of fabric.

With the extra fabric you took from the sides or using ribbon or some accent color fabric, cut two pieces 1/2" wide and about a foot and a half to two feet long. It just needs to be long enough to go around your arm and tie nicely. If you used t-shirt fabric, pull it lengthwise so that the edges roll. That way you don't see the raw edges so much.

Take a safety pin, fasten it to one end of a strip of fabric or ribbon. Thread the strip of fabric through the little arm tube thing. Tie loosely. You can tighten it when you put in on.

8. I don't have a pic of the last step. You just serge or zig-zag the bottom shirt hem. Zig-zag makes it flare a bit, which is nice and girly.

That should be it. Try it on and see if you like it. At least it should be better than the shirt you had before.

Friday, August 7, 2009

Homemade Instruments

I just moved to a new area, and I've really missed the musical kids activities that a friend of mine organized. I wanted to do it in my new area, but I don't have that many instruments. A little web searching, creativity, friend brain picking later, and I have three kinds of instruments I'm making: shakers, drums, and wrist bells. I cannot guarantee non-toxicity, though I've done the best I know how. As long as the kids don't swallow a chunk of an instrument it should be fine.

Here are some pictures and a brief description of the first: the shakers. You need a cardboard tube (toilet paper, paper towel), stapler, filler (beans, popcorn, etc.), and duct tape. You can also paint if you'd like, though I suggest a sealer of some kind (silicon spray or decoupage work) to prevent it from coming off with sticky or sweaty little hands.


Here is a picture of a painted shaker (still not completely finished). I forgot to take pictures before I stapled them, but you should be able to see what you do. Staple one side of the cardboard tube. Put in some filler. Close the second opening perpendicular to the first one, and staple. If you want to paint (and seal), do it now. Here's an upclose of the staples:


After your paint/sealer is dry, cut strips of duct tape long enough to cover the staples. I suppose this isn't necessary, but I think it's really important if you want little kids to use them, cause the staples can snag clothes or cause little boo-boos. Here's a picture of one I finished a while ago, and also my 1 1/2 year old playing with it.

Yogurt Pics


Here are two pictures of the yogurt. Unfortunately, I accidentally forgot to put the yogurt in the fridge before going to bed, so the yogurt is a bit lumpy from "running" too long. The first one is plain, and the second one has some sweetened condensed milk in it, which gave it a slightly "sticky" consistency.

I didn't take a picture of it, but I used some of the sweetened condensed milk yogurt to make homemade yogurt popsicles... holy awesomeness batman. I especially like to break it onto pieces on top of a warm waffle with some lemon curd. Mmmmm. Or just by itself as a popsicle as a bedtime treat. I just added about 2T water for every 1/3-1/2C, and then put them in popsicle molds. I'm told you can also use toothpicks in an icecube tray if you don't have popsicle molds. Just be sure to cover them if you do that.

Saturday, August 1, 2009

Making Yogurt

While perusing my favorite blogs a while back, I found some information on making yogurt (see http://heavenlyhomemakers.com/blog/make-your-own-yogurt-and-cream-cheese). I checked it out, and, as usual, I got super excited. If my husband didn't keep me in check I would waste so much money on the things I get excited about (many of which I don't actually finish). I did "need" to buy some glass jars. Unfortunately, I've realized since then, if I'd been more patient, I could have just accumulated various glass jars to use. But, that's what I get for being impatient. So, here's a rundown of the super easy and inexpensive way to make your own yogurt!

Materials:

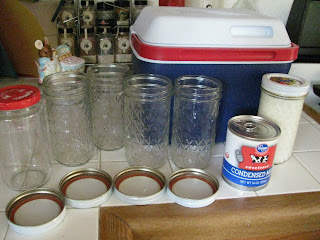
a cooler
sterilized GLASS jars (see notes)
food thermometer (candy, meat, whatever)
saucepan
any live culture plain yogurt
milk (raw or pasteurized; whole or 2%)
water, and a way to reheat it

optional - sweetened condensed milk, vanilla, other flavorings (I like to flavor with fruit syrup)


Directions:

1. Heat your milk in a saucepan (don't microwave; I think you could change important milk proteins). If it's older or your really concerned about bacteria, heat it to just boiling and then cool it. Just make sure the milk is about 120 degrees F (see note below). When you add room temperature stuff, the milk will decrease a bit in temp.


2. Add 2 heaping Tablespoons live culture yogurt in smaller jars, 1/2 Cup in larger jars. Add any other ingredients (mine below have sweetened condensed milk, and one has acai juice; always leave one plain so you can use it as your starter for the next batch).


3. Pour the warm milk in the jars until a bit below the rim. Please note that it is rather difficult to take a picture and pour milk at the same time, so don't try that unless you want a mess. Or use a funnel.


4. Stir really well with a fork or spoon. If you don't distribute the yogurt into the milk, your culture will be really slow going. Put lids on the jars.


5. Put warm water into the cooler. Be careful not to put in so much that they'll cover the top lid of the glass jar. Heat portions of the water until its 120 degrees F, or just under.


6. Put the jars in the cooler and close it on up. Check the water temp every hour or two. Try to keep the water temp about 120 degrees, 'cause it'll lose heat over time. I scoop out water with a mug, microwave it a minute, and then pour the water back in. I repeat until I get the water to the right temperature. However you keep the temp right is up to you.

7. Let it go for 8-12 hours; however long it takes for it to stay put when you tilt the jar. Then put it in the fridge to stop the process. Otherwise it curdles.


I don't have a picture of the finished product. I'll try to get one up soon. If you do plain yogurt, you can strain it with a cheese cloth to make yogurt cheese. Kind of like cream cheese but more tart. I like it with grated carrot, pimentos, and garlic salt. You can see instructions for that at the website I mentioned above.

I love my yogurt with honey and nutmeg, personally. I'm trying out the sweetened condensed milk mixed from the get-go on my mom's recommendation. Apparently when she was in college, they would make yogurt from sweetened condensed milk and put it on the space heater instead of in a cooler. I don't know if I can handle quite that much sugar, but it sounded yummy enough to try a smaller amount mixed with my milk. I hope anyone who tries it enjoys!


(Notes)

Glass Jars: They must be glass, from what I understand. I think it's probably because glass conducts heat better, plus there's no risk of any plastic toxin leaching into the yogurt. You can buy mason jars online or at a kitchen or grocery store. Or you can be really resourceful and save and clean your glass jars from jam, spaghetti sauce or whatever. I run mine through the dishwasher. The only ones I wouldn't recommend for this are pickle jars or other really strong smelling jars. Those need to air out forever before you can get the taste out of them.

Temperature: The bacteria that make yogurt thrive at 115 degrees F. They will grow between the temperatures of 98 and 125ish degrees F. Any higher than 125 (if I remember correctly), and they die. Any lower than 98, and they go dormant. Many sites suggest 90-110 degrees. I've found my yogurt takes forever at these temps. I get thicker yogurt at a median incubation of 115 degrees.